


Embroidery Size Chart Hacks That Save Time And Thread
Embroidery is fun! But it can be frustrating when your thread runs out in the middle of a design. Or when your patch ends up the wrong size. If you’ve ever been there, you know how frustrating it is.
That’s where an embroidery size chart comes in. It’s not just some boring numbers on a piece of paper. If you know how to use it right, it saves you a lot of time, fabric, and yeah—thread. Here are some easy tricks I found that really helped me solve common sizing issues.
Start Small, Think Smart
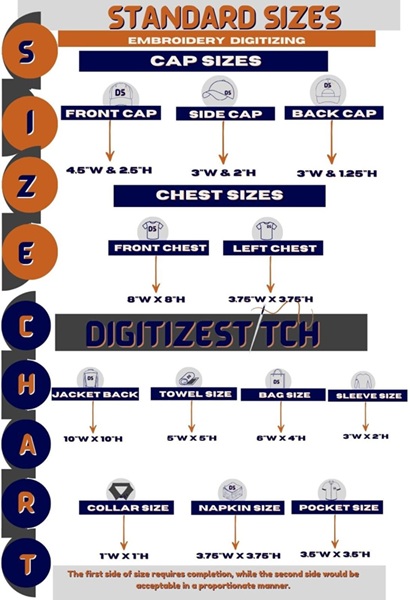
When I started out, I thought bigger was always better. I tried to make big custom embroidered patches on small caps, or small logos on big jackets. Guess what? Nothing looked right. So here’s the first tip: check the embroidery size chart before you touch your machine. Most charts give you size ranges for different items—hats, shirts, bags, even shoes.
Let’s say you’re working on a polo shirt. The safe size for a chest logo is about 3.5″ wide. Anything larger might curve weird around the chest. But if you’re doing 3D puff embroidery on a cap front, that size needs to be even smaller—usually 2.25″ to 2.75″ max. The chart tells you that in seconds. No guessing. No wasting supplies.
One Chart Doesn’t Fit All
Here’s a weird thing I figured out too late: not all brands or digitizers use the same chart. Some charts show hoop sizes, while others focus on actual design sizes. There’s a difference.
If you use embroidery digitizing services USA, ask about their preferred sizing first. Some services adjust designs based on your project type. Others need you to tell them the exact size. So don’t just grab the first chart on Google and trust it. Make sure it matches your machine and your project.
The “Trace Before Stitch” Rule
Even with the right size from the chart, test it. Always. Before I stitch anything real, I do a trace on my machine—no thread, just the outline. It’s fast, and it helps me see if the size fits the fabric space.
This saved me one time when I had to digitize logo for embroidery on a tote bag. I followed the chart, but when I traced it, I saw it was too close to the seam. If I had stitched it, the logo would’ve folded over.
So now I never skip this step. You shouldn’t either.
Don’t Ignore Stitch Count
Here’s something the chart won’t always tell you: size affects stitch count. Let’s say you scale a design up just 20%. It might look fine, but your stitch count can jump way higher than expected. And more stitches = more thread, longer run time, and sometimes broken needles.
If you use embroidery digitizing services USA, ask them to optimize the stitch count and size. Especially for 3D puff embroidery, where density really matters. Too many stitches in a small space, and your needle will hate you.
Know Your Fabric First
This sounds unrelated, but it’s not: fabric stretch changes how a design looks at different sizes. A 3” logo might look crisp on a denim jacket but get warped on a stretchy T-shirt.
So before you even glance at the chart, know what fabric you’re using. If it’s soft or stretchy, size down a little from what the chart says. If it’s thick or stiff, you can usually follow the chart exactly.
Saving Thread Is A Skill
I’ve wasted a lot of thread in my first year. Sometimes it was because I chose the wrong size. Other times it was because I resized a design without telling my digitizer. Now I check everything first. To make custom embroidered patches, I do the following: First, I use the chart. Then, I trace the design. Finally, I plan thread colors by section.
If you do this, you’ll see how much more efficient your work becomes. It’s not just about saving supplies—it’s also about saving stress.
Let Your Machine Help You
Modern machines are smarter than we think. A lot of them let you preview designs and sizes before stitching. Some even have built-in embroidery size chart tools or templates you can upload. If your machine has these features, use them. It’s faster than printing out a paper chart, and you can check it right on-screen.
When I digitize logo for embroidery, I always upload it to my machine’s preview tool before hitting “start.” If it looks off—even by a little—I go back and fix it. Trust me, one preview is better than tearing out stitches.
Patches Are Not Like Shirts
This one’s big: patches need a different size approach. They’re standalone designs, and you often sew them onto other items. If you’re making custom embroidered patches, the chart helps you pick a clean size. But also think about the patch border and placement. A 3″ patch with a thick border might not fit on a sleeve, even though the chart says 3″ is okay.
Also, 3D puff embroidery doesn’t work well on small patches. If you’re planning puffed letters, go a little bigger—maybe 3.5″—so the letters aren’t crushed. The chart can guide you, but use common sense, too.
Always Adjust For Real Life
Charts give you guidelines. That’s it. They’re not magic. You still have to make judgment calls based on your project, your fabric, and your machine. Sometimes I even break the rules on purpose. Like if I want a bold patch for a jacket back, I might go bigger than the chart says—because I know it’ll look good from far away.
But I only do that because I now understand what the chart is really telling me. And if I mess up, at least it’s a choice, not a guess.
Final Tip: Save Your Favorites
Once you find sizes that work great for certain items—write them down. I have a tiny notebook where I list my best sizes for hats, jackets, polos, hoodies, and even bags. That way I don’t have to measure or guess every time.
And when I work with new embroidery digitizing services USA, I send them my list. It helps them get the design right on the first try.